 How can I set the e-mail in Legalinvoice Germany?
You can find all e-mail settings by clicking on the 'Settings' menu and then selecting the 'General' submenu.
To make sure your e-mails are correctly sent and received it is important to properly manage your e-mail settings. You can find them in the menu 'Settings' > 'General'.
By default, e-mails are sent from an automatically generated e-mail address such as 'yourname'@my.billit.be.
When a customer reacts to such an e-mail, their answer will be forwarded to the e-mail address you set under 'My company'. This part consists of two subsections:
This enables you to send invoices from your own e-mail address via SMTP or by adding a TXT SPF record to your DNS settings.
Do you prefer e-mails to be sent from your own business address? That's possibe!
There are two options to send e-mails from your own address:
You can set an IMAP here which will read your inbox and import invoices via Fast input.
To allow the system to read your mailbox and import invoices via Fast Input your need to execute the IMAP settings. Scrol down to the section 'Send from your own emal address' > 'incoming' and fill in the IMPAP server data. Don't forget to update them if anything changes in your mail server settings such as a new password.
Even though strictly speaking digital invoices don't have a layout, the system always provides a visual representation of your invoices. This is used when, for example, you send an invoices as PDF.
When you create an invoice, quote, delivery note, order form or credit note in the platform they are created in the default layout. You can change it or even create several layout templates where you can choose from when creating a document. As soon as you create several templates you will see a dropdown menu to choose the one you prefer while you crete an invoice. This is especially useful when you want to create different invoices types with a different layout. Every default template is also automatically available in different languages. You don't need to create different templates for this.
Setting an invoice layout works just like setting the layout for a credit note, quote delivery note or order form.
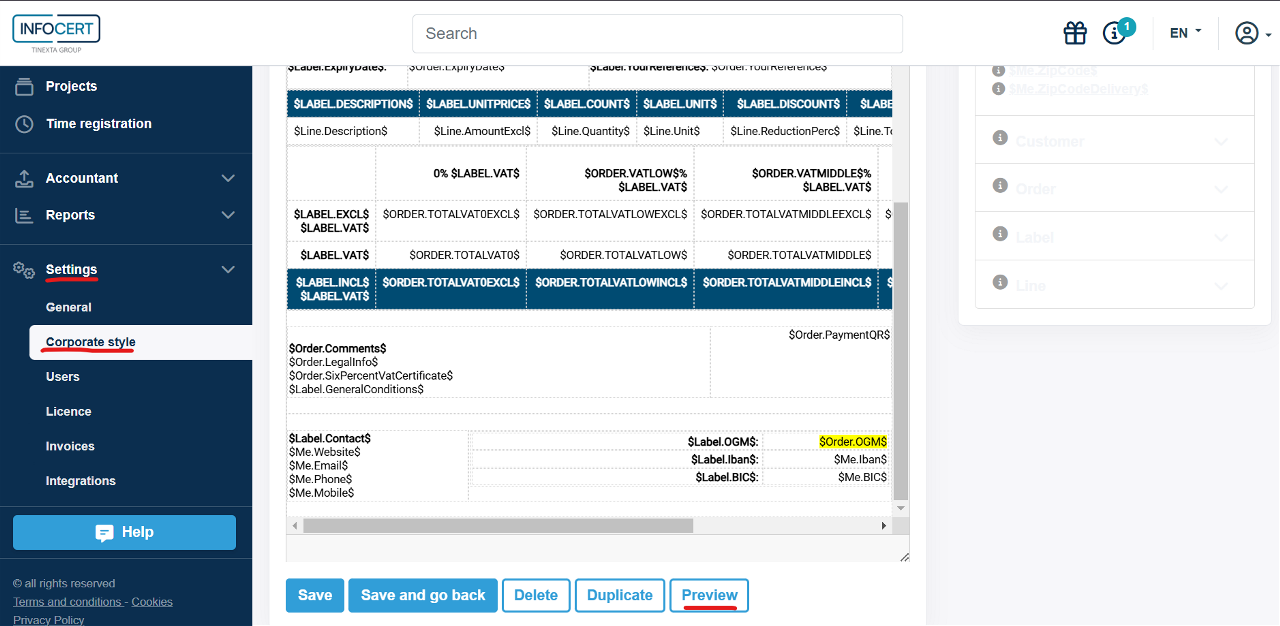
To set/change an invoice layout, go to 'Settings' > 'Corporate style'. Next, select the document for which you want to change the layout or add a template.
Select a template from the dropdown meny at the top to open the detail page for that tempalte. The first time only the invoice template 'Invoice 1' will be available. If you want to create a new template you can do this via the button 'Add' in the top right corner.
When you've chosen a template you will see the layout settings for this template below. They consist of a header - with the template name and the top and bottom margins - and a layout screen with the layout markup options.
After creating a new template or editing an existing template layout you can do one of these things:

NOTE: To preview your template, you must first save it and ensure you’ve created an invoice. The preview will use the information from this invoice to display a complete example.
Don't forget to fill in the name of your template after you set it and to indicate if it should become the default one.If so, this template will automatically load as the default when you create an invoice. However, you can always choose a different template from the dropdown menu at the top.
In the system an invoice is always automatically sent in the language of your customer (this is the language you assign to your customer in their file).
The available languages are: Bulgarian, Danish, German, English, Estonian, Finnish, French, Greek, Hungarian, Irish, Italian, Croatian, Latvian, Lithuanian, Maltese, Dutch, Polish, Portuguese, Romanian, Slovenian, Slovakian, Spanish, Czech, Swedish.
You can also customize the layout for specific languages. Click the plus sign next to the 'Global' tab to select the languages you want to set up with a different layout. When you select a language, the global template's layout will be copied to the new language-specific template. Any changes you make to this version (either in the editor or using CSS) will only apply to that particular language. The global template's style will continue to apply to all other languages not specifically selected or added.
NOTE: Automatic translation is only available for existing label keys. If you add custom text without using a label key, it will not be translated automatically. In such cases, you’ll need to manually provide the translation in the language-specific template.
